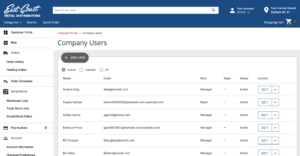
Once you have an online account set up with East Coast Metal Distributors you can add and manage users right from the Customer Portal. This allows you to add technicians, salespeople, and office staff so they can place orders, check pricing, pay invoices and more.
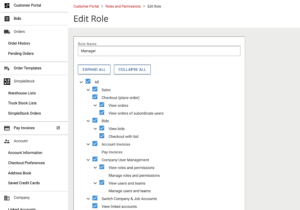
First, let’s talk about User Roles and Permissions. Each user will need to be assigned a role that will determine what they have access to. You now have the ability to create your own roles within your organization and choose the permissions of each. This will you customize what your employees can see or do while logged into their account.
Company Admin – After opening an account with East Coast Metal Distributors a salesperson or branch can help you set up your online account. The first person to be set up is usually the owner of the business. This person will be considered the Admin and will have full control of the account. The Admin can then add other users and manage the permissions of their other employees. Each employee can be set up with their own username and password under your account.

How to Create Roles and Set Permissions
- Login to your account at ecmdi.com
- Click on Roles and Permissions located to the left of the screen under the Company category
- Click ADD ROLE
- Name the Role you are creating (Ex: Manager, Technician, Accountant, Buyer, etc.)
- Check off the boxes next to the permissions you wish to allow that role to see and do.

How to Add Company Users
- Login to your account at ecmdi.com
- Click on Company Users located to the left of the screen under the Company category
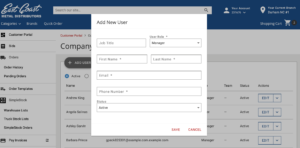
- Click on the grey ADD USER button at the top of the page
- Fill out the Add New User from with your employee’s information – The new user will get an email with instructions on how to set up their password and log in to their account.

Definitions of Permissions
All: By clicking all you will allow that role to do everything in the list of permissions
Sales: Allow users to place orders, view users and view orders of subordinate users
Checkout (place order): Allow users to place orders without an approval
View orders: Allow users to only view placed orders in the order history tab
View orders of subordinate users: Allow users to view placed orders in the order history tab
Bids: Allow access to view and accept bids from the customer portal
View bids: Allow user to only view bids
Checkout with bid: Allow user to add the bid to the cart for purchase
Account Invoices: Allow access to our Invoicing Portal, Billtrust.
Company User Management: Choose if your users can view, assign, and manage user roles and permissions.
View roles and permissions: Allow user to view the roles and permissions
Manage roles and permissions: Allow user to make changes to the roles and permissions
View user and teams: Allow user to view other users and teams on the account
Manage users and teams: Allow user to view, delete and edit other users and teams on the account
Switch Company & Job Accounts: If you have an account with multiple account numbers (companies) and/or job accounts this permission will allow users to toggle between the different options and place orders under each.
View linked accounts: Allow user to view your multiple accounts (if you have more than one)
View Account Credit Limit: If you are a credit account this will allow user to view your credit limit under customer portal and account details.
View Order Templates: Allow user to view order templates
Create order templates: Allow user to create and manage order templates
Pending Order: This is the section an employee can go to view orders that need to be approved before they are processed. The permissions below this section allow you to set limits to how your employees can place orders. When these are checked off you will be given additional permissions to set up under each user.
Set spending limits: When a user is assigned a role that has set spending limit checked off you will be able to set that spending limit under the users, found under the company users tab.
Approve orders: When a user is assigned a role that has approve orders checked off, they will be added to the list of users that can approve orders.
Assign/Unassign order approvers: Allow user to give order approval settings to other users.
We hope this helps you answer your questions about adding and managing users on our website like a pro. Still have questions? Contact your local branch or salesperson and we can help set up additional training on our website for you and your staff.


